Wednesday, August 8, 2012

Veggie Snacks

Thanks to my crazy schedule lately, I'm rather behind on my food posts!  However, I did want to share our family's most favorite snack food lately: roasted brussel sprouts!

This discovery occurred quite by accident, and all started with a regular trip to our local farmer's market.  My daughter had been intrigued by the mound of brussel sprouts for weeks by then, but I always just walked right by since I had long ago classified brussel sprouts as a nasty-tasting, limp, and boring vegetable that I was forced to eat as child.  Ick!  Not a positive association.  I finally gave in not long after starting this blog, realizing I should be encouraging my 4-year-old's veggie curiosities and not perpetuating the vegetable aversion I've had for as long as I can remember.  <Sigh.>  So, I let her fill up the bag with brussel sprouts (trying not to gag and wondering how in the heck I was going to prepare them) and off we went.  Honestly, the bag of brussels stayed buried in the produce drawer for a good week.

Then, my husband saved the day.  Yes, he gets all the credit for this bit of (simple) brussel sprout magic :)

He sliced 1 lb of brussel sprouts in half lengthwise, and tossed them with just enough olive oil, salt, and pepper to lightly coat the veggies.  He then placed the brussel sprouts cut side down on a cookie sheet (trust me, this is important!), and baked at 375 or 400 degrees until the aroma filled the house and the veggies had a fabulous color on them.  Once they were out of the oven, he squeezed the juice of one lemon over top and . . . oila!  Easy peezy!


I do have to confess, agreeing to try these veggies was a bit of a "grin and bear it" moment for me.  Jim was so very proud of his creation, but I am pretty sure that I kept flashing back to the steamed brussel sprouts of my nightmares . . . at least, until I got the first bit in my mouth! 

Roasting transforms this vegetable into a little bit of heaven, while the olive oil and lemon juice combine to  elevate the flavors even further.  The way I kept eating these, you would have thought they were potato chips!  I am so very grateful that I gave in to Abby's veggie curiosity and Jim's culimary creation.  We happily snacked on brussel sprouts the whole night while watching the Olympics -- sounds crazy, I know!  But this, my friends, is a little bit of foodiva magic.  Promise.  :)

Tuesday, August 7, 2012

Two LIttle Monkees!

You may have been wondering where I've been for the last week . . . the answer: up to my ears in "Two Little Monkees Jumping on the Bed!" party funness!

Party planning is certainly high on the list of my most favorite creative outlets.  In fact, I've loved throwing parties for as long as I can remember.  Some of my fondest memories of my childhood are spending hours with my mom pouring over our party planning book, selecting a theme to entertain all my friends, and knowing my mom was going to plan every detail to perfection.  I remember them all: the Mad Hatter Tea Party (where she forced my brother and his friend to be our waiters), the Cheerleader Party (where she paid my oldest brother's cheerleader friends to come and teach us high school football cheers and we totally got to dress up in their uniforms (awesome, right?!?!?!)), and the Campout Party (where she had family friends come entertain us with old time campfire songs and we made s'mores).  So it's not hard to understand why I've loved passing along the tradition to my own daughter -- and more recentlly, for my friends too.

I was delighted to plan this incredibly fun "Two Little Monkees Jumping on the Bed!" party for my friend Kym's two daughters, Kaylee (age 4) and Daphnee (age 1).  P.S. now that I've finally introduced them, you also know that I really do know how to spell "monkey," it's just that the double "e" is a thing for the Boisverts!  ;)  The theme was a perfect play on their names, but also on their rambunctious little spirits and the giggles and playfulness that fill their (totally awesome, brand new) home. 

My first order of business was hiring my friend Kristin to come up with a fabulous piece of artwork to anchor the party, as well as serve as a photo booth.  As you can see below, she more than delivered!  (I helped, but all I did was paint in the lines!)  And kudos to the girls' daddy, John, for building the board and to Kym for painting it a fabulous shade of purple.
I really can't thank Kristin enough for bringing my and Kym's idea to life and making it so darn CUTE!  The polka dots were an unexpected addition that were just too perfect not to carry throughout the party. 

With the artistic inspiration completed, my next call was to my friend Chelsea who makes AMAZING cakes -- both to eat and to look at!  In fact, for those of your who remember, she made the awesome rainbow cake for Abby's rainbow superhero party.  Yeah, pretty cool, right?  But check these cakes out!  I think she outdid herself:


If our request for these two custom cakes (with custom artwork) weren't enough, we also asked for SEVEN dozen cupcakes.  She didn't disappoint!  Thank goodness for the amazing ladies on etsy (especially AbbaGee and CraftsbyJilly), where I spent hours pouring over as much monkey themed, pink/green/purple polka dots as I could find!  I think I literally squealed with delight when the adorable custom monkey cupcakes toppers arrived.  And I think Chelsea squealed with delight when I told her she didn't have to decorate seven dozen cupcakes!


About a week before the party, I discovered my friend Monique had started a new company specializing in cake truffles, "Posh Desserts."  (Like her here: http://www.facebook.com/#!/sdposhdesserts!)  She did an awesome job with the monkey cake pops -- and judging by how fast they disappeared, they tasted pretty fabulous too!  She also made the beautiful banana pops (cuz monkeys have to have bananas to eat!) -- which ended up being quite a bit trickier than we anticipated, so major props to her!


So, with all of that, I'd say we created one fabulous cake table!
Of course, a party isn't just about creating an awesome cake table . . . so we hired the BEST taco cart service ever (though I think we also gave the taco lady a heart attack when we doubled the attendees two days prior! Doube the fun, right?  HA!).  We had two jumping castles, a play area for the babies, a giant chalkboard, a monkey (or should I say monkee?) pinata, and hand made (thank-you-very-much) goody bags to round out the fun:


And of course, since it's my blog . . . here's my little monkey :)


Thank you, Boisverts, for all the silliness and fun . . . it was great to plan a party with you and oh-so-fab to see it all come together!

Friday, August 3, 2012

Smoothie Quest 2012: Round 3

This week has been full of party planning (don't worry, definitely showing that Herculean effort off soooon!) but I had to take a moment to share my hands down, most favorite smoothie yet. 

one handful green grapes
1/4 carton raspberries (about 10)
10 strawberries
handful blueberries
one over ripe banana
1/3 cucumber, cut in small chunks
1 large handful clover sprouts

Pause: I'm sure this would have been delicious on it's own.  On a whim, however, I opened up my freezer and added:

1 large handful of unsalted mixed nuts

The result?????  Fruity, not too sweet, peanutty, lavendar-colored goodness.  INCREDIBLE.  My new favorite.  The nutty note in the smoothy definitely keeps it from raising your blood sugars and adds in a helpful blast of protein.  The berries deliver al lthe antioxidants I need to help me fight this yucky, not-needed head cold.  I'm in smoothie heaven!


I call it Nutty Lavendar.  :)

Enjoy, fellow foodivas!

Monday, July 30, 2012

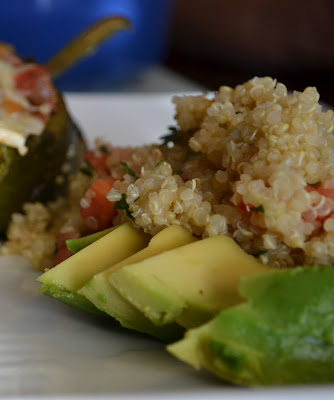
Chile Rellenos with Guacamole Quinoa

Riding the wave of all the positive feedback on the tacos (they are quite delicious, if you haven't tried them yet!), I decided to follow up with my other favorite way to eat vegetables: Chile Rellenos with Guacamole Quinoa.

First of all, these are not the deep fried, egg laden chile rellenos you may find in the local taco shop.  These are quite literally "filled chiles" -- filled with veggie-meat goodness, that is!

Step 1: Chile Rellenos

Start with

5 Poblano Peppers

Place peppers directly under the broiler.  Rotate as the chiles blacken, so all sides are roasted and have good color.  Set aside.  Turn oven to 425 degrees.  Then start to assemble the filling:

1 lb ground beef
salt and pepper
2 t cumin or two of cumin
1 t oregano

Saute the ground beef in a large pot or braiser.  While this is working, chop:

1 cup bella mushrooms
2 or 3 cloves garlic
1 red onion
1 jalapeno
(Esentially the same as the taco meat from two posts below, this is a great vehicle for all kinds of veggies -- I've even added spinach or carrots!)

Add to ground beef and cook over medium heat until veggies are tender and meat is cooked through.  Then add: one can of:

1 15 oz can of Fire roasted tomatoes

Turn heat to low.

Return to peppers and strip off as much skin as you can.  Make a slit in the flesh of the pepper without piercing it through.  Take a small spoon (tiny really, I use my daughter's toddler spoon), and CAREFULLY remove the seeds and ribs attempting to keep the pepper in one piece.  If it rips a bit, no biggie -- it will still taste delicious!

One this is done, transfer the peppers to a large baking dish (I use my 9.5x11 cake pan) and spoon the filling into the peppers They should definitely be overflowing with ground beef-veggie goodness.  One this is done, top with just enough

pepper jack cheese

to cover the meat.  Place the chile rellenos in back in the oven at 425 degrees until the cheese is browned and the meat mixture is bubbling.  Remove from heat and garnish with

Fresh, whole leaves of cilantro


Step 2: Guacamole Quinoa

Heat in a medium sized pot (with lid):

2 c chicken stock
1 bay leaf

Bring to a boil, then add:

1 c quinoa (I buy quinoa in bulk from Costco, awesome deal, and it's DELISH)

Return to a boil, then cover and cook over medium heat for 12 minutes (or until all water has been absorbed).  Remove from heat, fluff with a fork, and let sit COVERED for 15 minutes.  (Lesson learned: ensure NO steam is escaping from your pot while it is sitting for those 15 minutes!  My husband had insisted he didn't like quinoa for the longest time, until I realized the lid I was using had a vent and the grain was not steaming properly.  Once I closed the vent, the quinoa miraculously turned out perfectly light and fluffy!)  Pour quinoa into a medium sized bowl and add:

one diced tomato
1-2 handfuls of chopped cilantro (depending on your taste)
juice of one lemon
salt and pepper if you need it, I actually don't end up using it due to all the flavor imparted with the bay leaf and chicken stock)

Mix ingredients together.  To serve, spoon quinoa over

1/2 avocado, sliced


Step 3: Enjoy another Mexican-inspired foodiva dinner.  Y-U-M!


Thursday, July 26, 2012

Romanian Antohi Pepper Soup with Chickpea Salad: A CSA Bounty

Every other Wednesday, our CSA delivery arrives from our local organic farm.  I get excited for the fresh, whole food produce; my husband gets excited because he knows I am about to embark on an inspired cooking frenzy. 

(For those who may not have discovered the joy of CSA (Community Supported Agriculture), it is truly the cheapest, best way to get organic produce.  Local farms deliver fresh-picked produce directly to you, or a specified drop-off location.  And since it is fresh-picked it tends to last MUCH longer than organic produce does from the grocery store, or conversely it is actually picked at the appropriate ripeness instead of super early to allow for transport time.  Joining the CSA directly led to me starting this blog and truly diving into whole food cooking.)

This week, the CSA bounty was PEPPERS.  Padron peppers, jalapeno peppers, serrano peppers, and a variation I'd never heard of: Antohi Romanian peppers.  They look like a sturdier, smaller version of yellow bell peppers and are just as sweet. 


 Thus, it was time for pepper soup!

3T butter
5 Antohi Romaian peppers (or 3 yellow bell peppers)

Saute the above over medium heat in a large soup pot while you chop:

5 serrano peppers (with seeds)
2 cloves garlic (or 3 if you love it, like I do)
1 medium onion

Saute veggies all together until they begin to soften and brown.  While this is working, dice:

9-12 small red potatoes (~3 servings)

Add potatoes to the pan and let everything get a good color to it, scraping the bottom of the pan to get up all the browned bits (i.e. flavor).  Season with salt and pepper, then add:

1 quart chicken or vegetable stock

Bring to a boil and let simmer for ~15 minutes, or until potatoes are tender.  Remove soup pot from heat, and use either immersion or traditional blender to puree.  Finally, stir in

1/4 c milk
Garnish with cilantro and sour cream

You will LOVE this soup!  The potato adds the right amount of thickness, the peppers give it the right amount of zing, and the touch of milk brings home the comfort food quality you want it a beautiful bowl of homemade soup.  Of course, the best part of this soup is that the bits of red potato peel look like bacon, so you totally can fool youself into thinking you're having a super decadent treat ;) 


For the side, I threw together a quick salad of:

Cooked chickpeas (thank goodness for the excess amount my husband purchased for hummus the other day!)
Chopped cucumber
Diced tomatoes
A handful or two of clover sprouts, or any type that you prefer
A handful of flat leaf parsley
1 diced avocado

And dressed it with a simple dressing of:

Zest and juice from 1 lemon
1 T olive oil
1 t cumin
1/2 t salt
ground pepper

Whisk all together until emulsified and add immediately to the salad.  Toss and serve!

I love soup and salad preparation -- it's so fun and easy to change up the ingredients and experiment with the flavors!  As I was cooking this soup, I already planned to try it the next time wtih cauliflower instead of potatoes (always looking for diabetic friendly food!) . . . soooooo, stay tuned for the results of that one! 

Happy eating, fellow foodivas!

Sunday, July 22, 2012

Especialidad de la (Bianca)Villa

I have been dying to post about my specialty tacos -- YUM!  Growing up here in SoCAl, especially in San Diego, Mexican food is just our food.  Regardless of our family heritage, it's just our food.  (As this blog continues, you will see how it's influence seeps into all my cooking, e.g. jalapeno avocado hummus.)  My love of taco shop food has to be curtailed at this point, and as a result I have found creative ways of incorporating fresh ingredients into my taco shop favorites.

Step 1: Taco Meat - sans the taco seasoning packet.  Brown 1 lb of ground beef in a large pan, then add:

1 diced onion
2 cloves garlic
1 grated zucchini
1 grated carrot
cumin, salt, and pepper to taste


I saute over medium heat just until the meat is cooked through, then remove one child-size portion of meat for Abby's dinner.  She is definitely NOT a fan of spicy.  Then add:

1 whole jalapeno, chopped (including seeds)

Continue to saute until all veggies are tender and the aroma of the jalapeno has developed.  When it's all done, you'll have almost as many veggies as meat and waaaaaay more flavor than those salty taco seasoning packets.

Step 2: Cook the beans.

2 T olive oil
15 oz can black beans, mostly drained
plenty of onion and garlic powder
Salt

I heat the olive oil in a pot until it starts to smoke, then add black beans.  (Make sure it's a deep pot or you will have major splatter mess when you dump in the beans -- I know this firsthand!)  Cover with lots of onion/garlic powder and add enough water to barely cover the beans.  Let them heat up, then start smashing until the consistency is to your liking.  Add a pinch or two of salt, then heat covered medium high heat.  Check in about 5 minutes when the water evaporates, add more water if necessary and turn down to low to keep warm.

Step 3:  Char the tortillas.  As my dear friend Anna taught me, always over the open flame of a gas grill . .  or on a bbq.  Keep warm between two towels.

Step 4: Prep your toppings

Crumble a large chink of cotija cheese
Slice avocados
Shred romaine (or whichever lettuce is your fave)
Dice tomatoes
Cut lime wedges

Step 5: Assemble!

(Note: please forgive the poor quality of the photos and know that the food tasted infinitely better than the photos look!  The light in my dinner room at dinner time is not working for me lately  . . . )


Step 6: DEVOUR

And the beauty of these tacos .  . . they are so flavorful, with enough spice from the jalapeno, that I didn't even need salsa.  Who'd thought that was possible?! 

Don't be afraid to add veggies in the most unlikely of places.  We all happily devoured ours that night!

Monday, July 16, 2012

Summer Supper & Round 2 of Smoothie Quest 2012

Summer is in FULL swing and last night it was just waaaaay too hot to cook and my husband, who loves to BBQ, flatly refused.  I didn't blame him.  On top of the heat, we had pretty much had complete junk food for lunch so there was no way I was resorting to take-out for dinner.  Solution?  Hummus, veggies, and smoothies.  YUM-O.

What started as a simple hummus recipe of:

1 c canned garbanzo beans
1/4c sesame seeds (or tahini if your blender won't pulverize the itty bitty seeds)
1 clove of garlic
1 T cumin
1 T olive oil
1 T lemon juice
salt to taste

that I just dumped into my blender until it was a good consistency . . .

turned out to be entirely too bland (nasty really).  So, I opened my fridge and started digging through the latest CSA delivery box, finding these gems to add in:

1/2 avocado
2 small serrano peppers
(and a little more salt and olive oil)

and the result was:


YUMMMMMMMMMMMMMMMMMMMMMMMMMMMMY! 

A bit spicy, balanced with the creaminess of avocado and garbanzo beans.  Foodiva Heaven!  During this recipe discovery I also learned that salt is a absolutely vital component of hummus, whereas olive oil is not so much.  Interesting for me, since I have always associated hummus with a rather high fat content. 

I sliced up a platter of red and yellow peppers, carrots, celery, and cucumbers for dipping and you would have thought it was a pile of deep fried pita chips it went so fast!  There is something so incredibly satisfying about seeing your family (including a notoriously picky 4-yr-old) muching happily on homemade, whole food deliciousness.  Mission accomplished for the evening.

Dessert brought about Smoothie Quest: Round 2

After an earlier trip to the local farmer's market, I had an abundance of produce that was just begging to be smoothified.  My daughter sat at our kitchen table and started calling out ingredients, which consisted of:

Grapes
Strawberries
Blueberries (she absolutely insists on blueberries in her smoothies)
Raspberries
Bananas

No doubt, a delicious blend of fruit.  Though the berries are extremely low in fructose and have a low glycemic index, the bananas and grapes don't really jive with my smoothie ideal -- see "Smoothie Quest: Round 1" post from a few days ago.  (Note: grapes are a super easy way to ensure enough liquid is produced for the smoothie base, so still often find their way into my smoothie mixes.)   I still needed to up the veg factor, so on a hunch, I threw in:

Cucumber
Alfalfa Sprouts

Weird right?  At this point, we should call it the Kitchen Sink Smoothie.  Yes, that's what I think I'll call it.


(On a side note, before I flipped the switch on this smoothie, I was once again struck by how really beautiful food is that God makes.  Every color of the rainbow was in my vitamix . . . it's amazing to me. Perfection.)

Moving on . . . the resulting smoothie was not only beautiful in it's own right, it was shockingly delicious!  The sprouts were completely pulverized, so left no stringy bits, while they also served to cut the sweetness of the grapes.  The freshness of the cucumber highlighted the lovely berry mix . . . all in all, my new favorite!  And my baby girl?  Well, she was quite proud of herself . . .


She is known for loving to help in the kitchen, and having quite the imagination, but is not so adventurous when it comes to her palate.  She prefers milk and water ("I don't like juice, Mommy"), so even getting her to try these smoothies has been a challenge (strange, I know).  Letting her choose all the ingredients and seeing Mom and Dad chug down the yumminess apparently won her over though. . . .


And she even garnished her Kitchen Sink Smoothie with a slice of lemon.  That girl :) 

All in all, it was a happy night.  Raw, whole food preparation on a hot summer day and actually having my family enjoy it -- BLISS.  Foodiva bliss, that is!

Saturday, July 14, 2012

Greek Influence

Several months ago, a friend of mine invited me over for a cooking lesson from her very own mama, the fabulous Georgia of "Georgia's Greek Cuisine" at 3550 Rosecrans St, San Diego.  I had the best time hearing her stories of growing up in Greece, laughing while we shared the food prep tasks, and taking directions from our local master of Greek cuisine.  Best of all, my palate was rewarded with ridiculously delicious spanakopita, tiropita, and meatballs. 

We did our best to capture the recipes, but alas, Georgia cooks by feel much more than she does by a recipe.  We went home that night with a list of ingredients and cook times and it seemed to me that recreating these foods was going to be an exercise in cooking by memory and instinct.  For a girl whose cooking has always been heavily dependent on recipes, this was incredibly scary.  So for months, I satisfied my Greek food cravings with visits to the restaurant as often as I possible (not at all a bad option, let me tell you!). 

Finally, though, inspiration struck with a recent foray into gluten free eating.  Knowing I had to get beyond boring chicken and salad dinners, I took the plunge and pulled out Georgia's list of ingredients for Greek meatballs.

1. Ground turkey
2. Fresh mint
3. Fresh basil
4. Garlic
5. Minced Onion
6. Breadcrumbs to combine (not g-free, I know)

I did my best to eyeballs the amounts of each, mixed it all together, and dropped them into hot olive oil to brown on both sides.  This first recreation of the most delicious meatballs EVER was much better than I expected.  Paired with a salad and no-noodle eggplant lasagna (don't worry, that recipe deserves its own post next week), I had a hit on my hands.  The family loved it!

Not only were the meatballs delicious, but it was the first real entree I had ever made without a recipe to hold my hand -- woohoo!  And I must admit, this small success had me wanting to make the recipe my own.  

The next week, my CSA delivery arrived with fresh cucumbers, basil, and microgreens -- a perfect beginning to a Greek meal!  As the day went on, I had a plan to transform the meatballs into a delicious and artistic appetizer.  I call it Greek Meatcakes . . .because they look like cupcakes :)

For the meatcakes:
1. 1 lb ground turkey
2. Two handfulls each of finely chopped basil and mint
3. Three cloves minced garlic
4. One yellow onion, finely minced*
5. Salt/pepper to taste
6. Lightly beaten egg.
*A note on the onion, chop as finely as possible, over and over.  Or use a food processor.  Large chunks of onion will make it harder to form the meatballs and increase the chances they'll fall apart.

For the topping:
1. 1 tub of Greek yogurt
2. One peeled, grated, drained cucumber

To make the "cakes," mix all ingredients with your hands until well combined.  Form into meatballs with either a large tablespoon or 1/8 measuring cup to maintain consistent size.  (I roll all the meatballs while the olive oil heats in a nonstick pan over medium heat -- this makes me feel very efficient, haha!)  Drop the meatballs in the heat, and flatten slightly to help cook evenly.  It is imperative to get a good crust on both sides of the meatcakes, so make sure the oil is well heated prior to adding the meatballs.  I cook over medium heat until a dark golden brown crust developed on both sides (about 10-15 minutes, depending on thickness).  Set aside. 

For the topping, combine the Greek yogurt with grated cucumber and refrigerate for 10-15 minutes.  Don't forget to drain most of the liquid out of the cucumber so you don't end up with soupy yogurt sauce!  I do this by grating the cucumber into a towel and then wringing the towel out over the sink.

Feeling very artistic, I lined my meatcakes out onto a pretty platter, slathered on the yogurt sauce, and topped with beautiful microgreens for some color and artistic flare.  And, Bravo!, I had my very first foodiva creation.  And yes, it tasted as good as it looks!  Just ask my husband . . . he ate almost the whole tray of g-free goodness.  Love!


All that to say: thank you, Georgia, from the bottom of my heart.  You shared your amazing food and love of cooking with us, and it truly inspired me to finally create meals without recipes and with instinct.  The hands-on experience, sans measuring cups/spoons, changed my culinary world.  FINALLY! 

Wednesday, July 11, 2012

Smoothie Quest 2012: Round 1

I've never been one for overly sweet treats; for example, I've always preferred dark chocolate, tangy cherries, and almost unripened bananas over the alternatives.  (As you will see throughout this blog, my aversion to anything overly fruity or sugary also stems from a family history of diabetes . . . truuuuust me, not something I want to continue!)  That said, it's a bit of a challenge when these dog days of summer demand something cool, refreshing .  . . and definitely sweet.  So, on a quest to find a refreshing treat for my family that doesn't send our blood sugars soaring, I finally pulled down the VitaMix.  This summer I am determined to discover the perfect, delicious, not-too-sweet summer treat.  Thus begins:

Smoothie Quest 2012!!!

My favorite smoothie discovery yet, and it was nothing more than a dump of use-it-or-lose-it produce into my beloved VitaMix.   You might call it chance; I call it "Pretty n' Pink" ;)


Pretty n' Pink Smoothie
2 1" slices of pineapple (core included if you have a VitaMix)
10 strawberries (stems included, again if you have a VitaMix)
One head of red leaf lettuce (I got this amazing delivery of red leaf lettuce from my CSA last week)
1/4 head of broccoli (or more if you love broccoli . . . honestly, I was adding it in for the nutrition. haha)

Seriously, it was delicious.  My husband is a total fan of veggie smoothies -- and to me, they always look smell, and taste like D-I-R-T.  Between the pineapple and strawberries here though, there is just enough sweetness and just enough color to brighten up this smoothie and make it the first blog-worthy success of Smoothie Quest 2012.  TRY IT!  And then come back and let me know what you think.

Sunday, July 8, 2012

Hello!  Welcome to my blog and my inaugural post.  I am so excited to finally be getting started!! 

My name is Bethany and I am a foodiva -- I love food and I love using it as medium to express my art.  I appreciate food as art that we require to survive, as a tool to tap all our senses: taste, sight, smell, hearing, and touch.  I desire to create food that communicates my passion for beauty and satiates my family's need for tasty treats and healthful choices.  When I find the sweet spot between these demands, I have truly achieved something worth sharing!

My love for art of all kinds will seep into this blog, as well.  I strive to develop my artistic tendencies, despite a very uncreative day job.  As I blog my artistic journey, I look forward to both inspiring and being inspired. Photography, painting, cooking, writing, dancing . . .they all have their place in my heart and will have their moments in this blog.  So here I am, my friends and fellow artists: The Dancing Foodiva. 

Seeking art in the everyday.